


Proline's New Dedicated Barbecue Pro and Ultra Hood Series (& how to install)

Table of Contents
Attention grill masters and backyard chefs! Proline's latest barbecue hood series is here to revolutionize your outdoor cooking. With 2,000 CFM of raw power, precision controls, and a sleek, durable design, these hoods are the secret ingredient your BBQ setup has been missing.
We're about to unbox, feature, and install Proline's newest innovation. Want to see it in action? Check out our video below, or read on for the sizzling details!
You can browse our newest dedicated BBQ hoods right here.
Unboxing the Proline Barbecue Hood Series
When you receive your new Proline barbecue hood, you're in for a treat. Let's dive into what you'll find in the box:
- Ducting Transitions and Hardware: Each hood comes with two ducting transitions and all the necessary hardware for installation.
- Filters: You'll receive two complete sets of high-efficiency baffle filters. These are fully dishwasher safe, making maintenance a breeze.
- Grease Trays: Two grease trays are included, ensuring easy cleanup after your grilling sessions.
- Easy Hanging Mount Bracket: This innovative bracket simplifies the installation process, making it easier than ever to get your hood up and running.
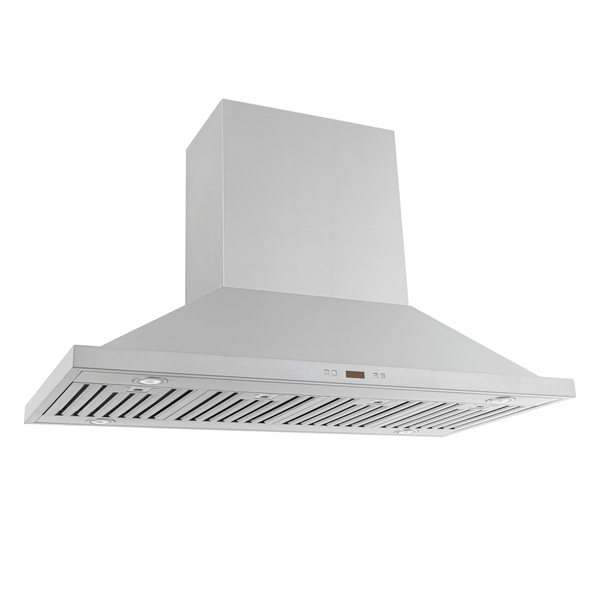
- The Hood Itself: Wrapped securely in the box, you'll find the star of the show - your new Proline Barbecue Hood. It features a robust 1.2 mm thick 304 stainless steel construction, the thickest we've ever developed for ultimate durability in outdoor conditions.
Inside the hood, you'll discover:
- Dimmable, sealed lights that can be adjusted to illuminate your cooking area perfectly
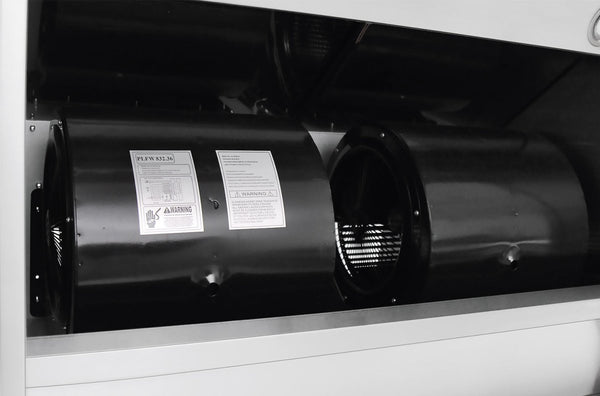
- Independent control knobs for the blowers, offering precise ventilation control
- An airflow separator designed to reduce cross-contamination and improve efficiency
As you unbox your Proline barbecue hood, you'll immediately notice the quality and attention to detail that goes into each unit. The substantial weight and sleek finish speak to its durability and premium design.
Key Features
- High-Powered Ventilation
- Dual blowers, each providing 1,000 CFM
- Total airflow capacity of 2,000 CFM
- Four speed settings per blower for precise control
- Independent Blower Control
- Separate knobs for each blower
- Allows for customized airflow based on cooking needs
- Dimmable, Adjustable Lighting
- Sealed lights for outdoor durability
- Adjustable positioning to illuminate specific cooking areas
- Dimmable for ambiance control
- Airflow Separator
- Reduces cross-contamination within the hood
- Improves overall ventilation efficiency
- Durable Construction
- 1.2 mm thick 304 stainless steel
- Thickest range hood Proline has developed
- Designed to withstand harsh outdoor conditions
- High-Efficiency Baffle Filters
- Six filters in total (top and bottom)
- Completely dishwasher safe for easy cleaning
- Effective grease and smoke filtration
- Easy Installation
- Includes easy hanging mount bracket
- Compatible with direct cabinet mounting using pre-cut keyholes
- Grease Management
- Two grease trays included
- Simplifies cleanup and maintenance
- Ducting
- Requires 8-inch duct
- Two separate duct transitions for optimal performance
Ready to elevate your outdoor cooking game? Your new Proline barbecue hood is the key to grilling perfection, and we're here to ensure you nail the installation. Whether you're a DIY enthusiast or just want to understand the process, we've got you covered.
In this guide, we'll walk you through every step of the installation, from essential tools to pro tips that'll make your life easier. Want a visual walkthrough? Check out our installation video below. Prefer to read at your own pace? Scroll down for our comprehensive written guide.
Let's turn that box into a fully functioning, high-performance barbecue hood!
Tools and Materials Needed
-
- Level (large and small)
- Power drill/driver
- Pencil and sharpie
- Knife
- Tape measure
- Hardware packet (provided)
- Easy mount bracket (provided)
Installation Steps
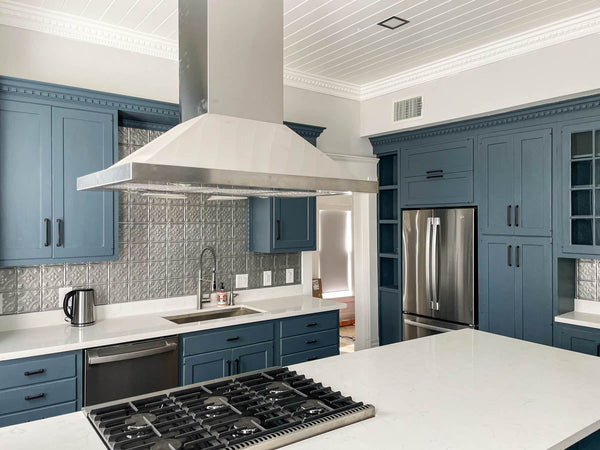
- Space Planning
- Ideal mounting height: 36 to 42 inches above cooktop
- For this guide, we'll use 72 inches from floor to hood bottom
- Marking the Space
- Measure width and height of installation space
- Mark center point for hood placement
- Note: Bottom of hood should be at the 36-inch mark above cooktop
- Mounting Bracket Installation
- Hood is 18 inches tall; factor this into bracket placement
- Attach easy mount bracket to hood back using provided machine screws
- Secure bracket at four points on left and right, plus four center screws
- Wall Mounting
- Center the wall portion of easy mount bracket
- Bracket is 38 inches wide; center point at 19 inches
- Secure bracket to wall studs (not just drywall)
- Use multiple securing points along bracket for stability
- Important: Ensure adequate support; the bracket design offers flexibility for various stud spacings
- Hanging the Hood
- Lift hood and slide onto wall-mounted bracket
- Ensure secure fit
- Tip: This step may require two people due to the hood's weight
- Ducting
- Use 8-inch duct
- Install two separate duct transitions
- Important: Do not combine ducts; each must be run separately for optimal performance
- Final Assembly
- Install baffle filters (six in total)
- Place grease trays
Additional Important Notes:
- If mounting directly to existing cabinetry, use pre-cut keyholes on top of the hood instead of the easy mount bracket.
- The easy mount bracket is designed for wall mounting without existing cabinetry. If you have cabinets already installed, use the keyholes for direct mounting.
- Ensure proper ventilation: Each blower requires its own separate ducting for maximum efficiency.
- The hood's substantial weight and 1.2mm thick stainless steel construction require proper support during installation.
- After installation, test all functions: blower speeds, light dimming, and adjustable light positioning.
Always prioritize safety and proper support when installing. If unsure about any step, consult a professional installer or contact Proline support at 877.901.5530 or support@prolinerangehoods.com.
Pro Tips for a Smooth Installation
-
- Preparation is Key
- Carefully read all instructions before starting
- Lay out all tools and materials beforehand
- Clear the installation area for safe, easy movement
- Safety First
- Wear safety glasses and gloves
- Use a sturdy ladder or step stool for overhead work
- Have a helper assist with lifting and positioning the hood
- Precise Measurements
- Double-check all measurements before cutting or drilling
- Use a laser level for perfectly straight lines
- Mark stud locations clearly for secure mounting
- Bracket Installation
- Ensure the wall bracket is level before securing
- Use high-quality mounting screws appropriate for your wall type
- If studs aren't ideally placed, use a mounting board across studs
- Electrical Considerations
- Turn off power at the circuit breaker before any electrical work
- If you're not confident with electrical connections, consult an electrician
- Ensure proper grounding for safety
- Ducting Best Practices
- Minimize bends in ductwork to maintain airflow efficiency
- Seal all duct joints with aluminum tape or mastic sealant
- Insulate ducts in unconditioned spaces to prevent condensation
- Hood Placement
- Use cardboard from the packaging to protect the cooktop during installation
- Have a helper hold the hood while you connect wiring and ducting
- Ensure the hood is level and flush against the wall or cabinets
- Filter and Grease Tray Installation
- Install filters after all other steps to avoid damage
- Ensure grease trays are properly seated for effective grease collection
- Post-Installation Checks
- Test all blower speeds and light functions
- Check for any unusual vibrations or noises
- Ensure all packaging materials and debris are removed from the hood
- Preparation is Key
Maintenance Tips
- Clean filters regularly in the dishwasher for optimal performance
- Wipe down the hood exterior with stainless steel cleaner to maintain its appearance
- Schedule annual inspections to ensure all components are functioning properly
Remember, proper installation is crucial for the hood's performance and longevity. If you encounter any difficulties or are unsure about any step, don't hesitate to contact Proline support or consult a professional installer. Your safety and satisfaction are our top priorities.
If unsure about any step, consult a professional installer or contact Proline support at 877.901.5530 or support@prolinrangehoods.com.
Unleash Your Grilling Potential
Your outdoor culinary journey is about to reach new heights. With the Proline Barbecue Hood's powerful ventilation, precise controls, and rugged durability, you're equipped to tackle any grilling challenge.
This isn't just an upgrade—it's a transformation of your outdoor cooking space. Say goodbye to smoke-filled patios and hello to perfect sears, delicate marinades, and hours of comfortable cooking.
Ready to revolutionize your backyard barbecues? Your Proline hood awaits. Fire it up, and let the grilling begin!
Check out our newest hoods built to BBQ right here!