


How to Install Range Hood Duct: Step-by-Step Guide for a Safe, Code-Compliant Kitchen

Table of Contents
Introduction
A properly installed range hood duct system is the cornerstone of effective kitchen ventilation. Whether you're a professional contractor or a DIY enthusiast tackling a home renovation project, understanding the intricacies of range hood duct installation is essential for creating a healthy, comfortable cooking environment.
This comprehensive guide breaks down the complex process into manageable steps, providing you with expert insights and practical tips to ensure a successful installation.
NOTE: This is for experienced DIYERS and we recommend consulting a professional first.
Tools and Materials Checklist
Proper preparation ensures a smoother installation process. Use this comprehensive checklist to gather all necessary tools and materials before beginning your project.
Essential Tools

Measuring Tape, Level, Drill + Bits, Hole Saw, Jigsaw, Screwdriver Set, Stud Finder, Utility Knife, Safety Equipment, Tin snips, Duct crimper
Required Materials

Step-by-Step Installation Guide
Phase 1: Planning and Preparation
Measure and Plan Your Route
Determine the shortest possible path from hood to exterior
Identify potential obstacles (wiring, plumbing, studs)
Calculate total duct length including all bends (link to calculator)
Choose the Right Duct Size
Match duct diameter to hood outlet size
Never reduce duct size as it restricts airflow
Common sizes: 6", 8", or 10" diameter
Verify Local Codes
Check building codes for requirements
Obtain permits if necessary
Verify clearance requirements
Phase 2: Ductwork Installation
Create Wall/Ceiling Opening
Mark exact location for duct passage
Verify absence of electrical wiring or plumbing
Cut opening slightly larger than duct diameter
Reinforce framing if necessary
Install Exterior Vent Cap
Apply weatherproof sealant around opening
Secure vent cap according to manufacturer instructions
Ensure proper flashing if roof-mounted
Assemble Ductwork
Cut duct sections to precise measurements
Join sections with appropriate connectors
Secure joints with sheet metal screws
Seal all connections with metal duct tape
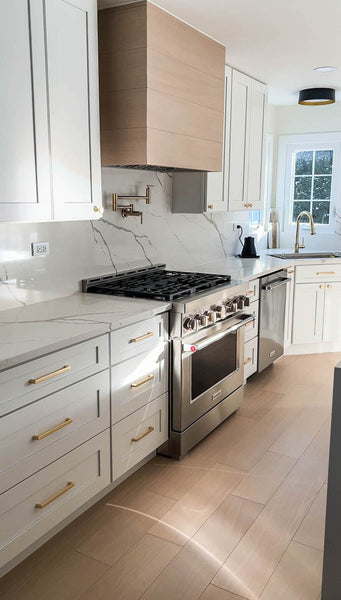
Phase 3: Range Hood Mounting
Position the Hood
Mark mounting locations on wall/cabinet
Ensure proper height (typically 30"-36" above cooktop)
Verify the hood is centered over cooking surface
Check that it's perfectly level
Secure the Hood
Drill pilot holes at marked locations
Install mounting hardware into studs or solid backing
Hang hood securely on mounting hardware
Tighten all fasteners
Connect Electrical
Turn off power at circuit breaker
Connect wiring according to manufacturer instructions
Phase 4: Final Connections and Testing
Connect Hood to Ductwork
Align hood exhaust with installed ductwork
Secure connection with sheet metal screws
Seal joint with metal duct tape
System Testing
Restore power at circuit breaker
Test all hood speeds
Verify proper airflow at exterior vent
Check for any air leaks along duct runs
Finish Work
Install any chimney covers to hide ductwork
Clean up installation area
Start cooking!
Understanding Ducted vs Ductless

Building Codes and Safety Requirements
Adherence to local building codes is not just about legal compliance—it's about ensuring the safety and efficiency of your ventilation system.
Common Code Requirements
- Minimum distance from cooking surface (typically 30"-36")
- Fire-rated materials for all ductwork
- Proper electrical connections
- Exterior termination clearances from windows, doors, and air intakes
- Make-up air requirements for high-CFM systems
Make-Up Air Requirements
Many jurisdictions now require make-up air systems for range hoods exceeding certain CFM thresholds. Verify with your local building authorities if a make-up air system is required.
Frequently Asked Questions
How high should my range hood be installed? +
The optimal height depends on your cooktop type:
- Electric & Gas: 30"-36" above cooking surface
- Grill: 36”-42” above cooking surface
Always verify manufacturer specifications, as some high-BTU gas ranges require specific clearances.
Can I use flexible duct for my range hood? +
While flexible ducts are easier to install, rigid metal ducts are required because they:
- Provide better airflow (up to 40% more efficient)
- Have greater fire resistance
- Last significantly longer
- Create less noise from airflow turbulence
Do I need a dedicated circuit for my range hood? +
Most residential range hoods can operate on a shared 15-amp circuit. However, high-end models with powerful motors, integrated lighting systems, or smart features may require a dedicated 20-amp circuit. Always consult the manufacturer's specifications.
How do I calculate the correct hood size for my cooktop? +
For optimal performance, your range hood should extend 6 inches beyond your cooktop size.
Example calculations:
- 30" cooktop with wall backing: Minimum 36" hood
- 36" cooktop island installation: Minimum 42”
What's the maximum duct length recommended? +
As a general rule, keep the total equivalent duct length under 30 feet. Remember to subtract 5-10 equivalent feet for each 90° turn and 2-5 equivalent feet for each 45° turn. Longer runs significantly decrease efficiency and may require an in-line booster fan.
